Most people buy an interface, plug a microphone into the first hole they find, arm a track, and hit record. Then they wonder why the take sounds thin, why the headphones have a slap back delay, and why the whole thing resets itself every time the laptop sleeps. None of that is the interface's fault. It is the setup.
A USB audio interface setup is really three jobs stacked on top of each other: getting the driver layer right, staging the gain so the converter has something clean to work with, and routing the monitoring so you can hear what you are actually doing. Get those three right on a cheap box and you will beat a badly configured expensive one every time. That is not a motivational line. It is just how the signal chain works.
This guide walks the whole thing in order, from the driver install to the final test take, using two entry level interfaces that cover most of what a home recordist needs: one budget 2x2, and one from a brand with a long track record.
Why you should trust me
I have been tracking bands, podcasts, and singer songwriters out of a small studio in Nashville for about ten years. I started on a cheap two channel box that hummed if you looked at it wrong, and I have owned or borrowed nearly every interface under a certain tier since, mostly because I wanted to know whether the cheap ones were genuinely catching up. They are, faster than most people think.
My rules have not changed. No opinion on an interface without real recording time behind it, across more than one kind of microphone. No latency claims without a round trip test on an ordinary laptop, because spec sheet latency and real world latency are different numbers. And no "pro studio sound" talk, because the interface is maybe ten percent of what you hear. The rest is the room, the mic, the player, and the gain staging.
I keep a drawer of dead interfaces. Most of them died at the headphone jack, which is the part nobody puts on the marketing sheet. That drawer is why the setup order below is the order it is.
How I picked and how I tested
The two interfaces here were chosen on four questions, and they are the same four I ask about any box that lands on my desk. Do the preamps stay clean when you push the gain up, or do they get gritty by two o'clock? Do the drivers survive a reboot without resetting your buffer and sample rate? Does the round trip stay under 10ms on a mid range laptop with plugins running? Would I track a paying client's session on it?
Everything else is marketing. Input count matters less than people assume. You do not need eight inputs to record a podcast. You need two good ones and a mix minus that works. Podcast routing is where cheap interfaces quietly fail, and it is worth knowing before you buy rather than after.
I also weighed the boring stuff. Does the box need a separate power supply for phantom power, or does it run off the bus? Does the headphone amp drive a 250 ohm pair of cans without folding? Does it behave on a bus powered port when the laptop is on battery? On a budget interface, that last question is usually where the trouble starts, and it is one of the reasons the two picks below stay on this list.
The interface at the center of the setup
Everything else in the chain, the mic, the cable, the headphones, the room, is downstream of this decision. Two boxes cover the ground for most home setups, and both of them keep the front panel simple enough that you can learn it in an evening.
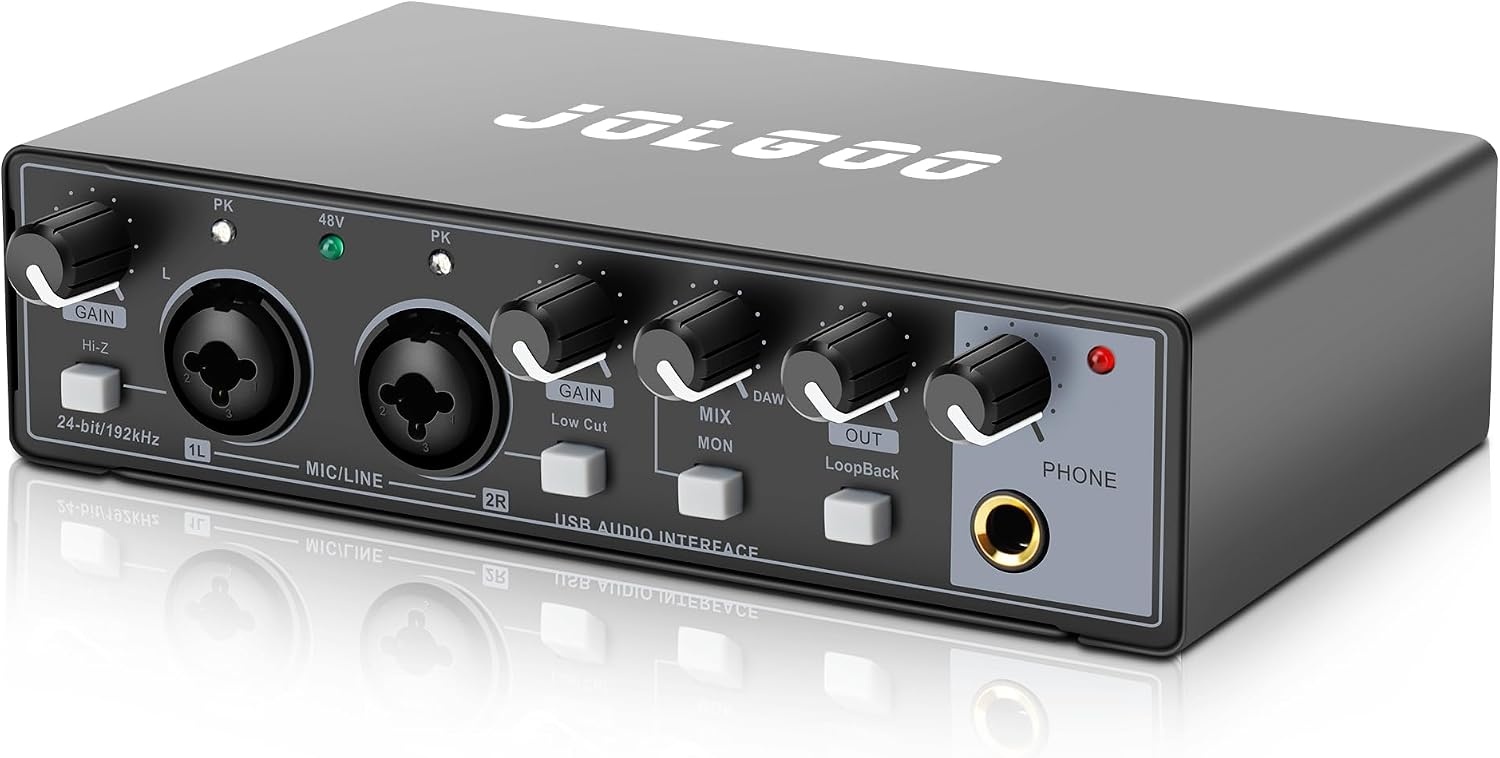
Budget pick: Jolgoo 2x2 USB Audio Interface, 24-Bit/192kHz Phantom Power Recording Card
 Visit on Amazon →
Two inputs and two outputs, 24 bit conversion up to 192kHz, phantom power on board, bus powered over USB. For a first setup that combination is basically the whole checklist. Two inputs gets you a vocal and a guitar at the same time, or two microphones for an interview. Phantom power means a condenser works without a separate preamp or a wall wart. The 192kHz figure is a number you will not use in practice, but 24 bit is real, and 24 bit at 48kHz is where you will actually live.
Flaws but not dealbreakers: On this tier of gear, the driver is the product. Install the manufacturer's driver rather than letting the operating system grab whatever it wants, plug the interface into a port on the machine and not a hub, and give it a direct connection especially when a condenser is running on phantom power. If it ever forgets your buffer settings after a reboot, that is a driver issue, not a dead box, so reinstall before you return it.
Anyone who wants to record a vocal and an acoustic guitar into a laptop while spending as little as possible to learn the workflow will be happy here.
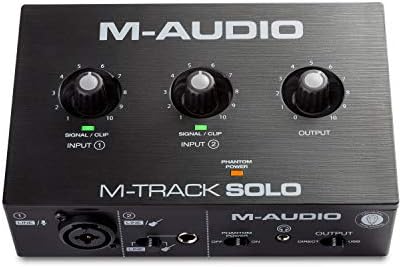
Our pick: M-AUDIO M-Track Solo USB Audio Interface
 Visit on Amazon →
M-Audio has been building entry level interfaces for a long time, and the M-Track Solo is the stripped down member of that family. The reason I point beginners at it is not the feature list. It is that the front panel is simple enough to learn in one sitting, and the driver history is long enough that you are not the beta tester for it. Between the two boxes here, this is the one I would hand to somebody who has never armed a track in their life.
Flaws but not dealbreakers: Simplicity cuts both ways. With a single input path you make one decision and live with it, so if you already know you want two microphones running at once, take the 2x2 instead. And on any bus powered interface, leave phantom power off until the mic is connected and the gain is all the way down. Hot plugging a condenser with phantom already engaged is an expensive way to learn that lesson.
Anyone recording one source at a time, a vocal, a guitar, a podcast host, and who wants zero setup friction, will get along with this one.
What else has to be on the desk
The interface is the hub, but it is not the setup. Have these before you start, because running out mid session is how people end up recording an acoustic guitar into a laptop's built in mic.
- A microphone. A dynamic mic is the forgiving choice for loud sources: drums, guitar cabs, a belt it out singer. A condenser is the choice for quiet, detailed sources, and it needs phantom power, which both interfaces above supply.
- An XLR cable long enough that you are not recording with your face in the laptop fan. Six to ten feet covers a small desk.
- Closed back headphones. Open back cans leak into the mic, and you will hear it later and hate it. If yours are high impedance, check the headphone amp before you blame your mix.
- A stand and a shock mount or desk stand. Handling noise is the single most common reason a first take is unusable.
- A pop filter for anything with plosives in it.
- A free USB port on the computer itself. Not a hub, not a monitor dock, not a keyboard. A bus powered interface with phantom power on wants the direct port.
One more decision before you arm anything: how you will monitor. If you track through speakers, the mic hears them and you get a feedback loop or a room full of bleed. Headphones solve it. That is why the headphone jack is quietly the most important spec on a cheap interface, even though it never makes the front of the box.
The actual setup workflow
This is the order. Follow it top to bottom and you skip most of what people post about.
Step one: install the driver before you plug in the interface. Download it from the manufacturer's page, run the installer, and let it finish completely before you connect the hardware. Half of the "my interface crackles" threads on the internet are people who plugged in first and let the operating system pick a generic driver.
Step two: connect, then set the device in your software. In your DAW, choose the interface as both the input and the output device. Do not leave the output on the laptop speakers while the input runs through the interface, or you will chase a sync problem that does not exist.
Step three: set sample rate and buffer. Set 48kHz and a 128 sample buffer to start. If you get clicks and pops, move to 256 samples. Higher buffers mean more latency but fewer dropouts, and the buffer is the single biggest lever you have over round trip delay.
Step four: gain staging. Connect the mic with the gain all the way down, then bring the gain up while watching the meter. You want your loudest passages peaking somewhere around -12 to -6 dBFS. Not touching zero, not in the red. The meter should kiss yellow on the biggest note and sit comfortably below it the rest of the time. If the preamp starts to sound gritty or hard before you get there, you are hearing the preamp, and that is useful information.
Step five: phantom power, last. If you are using a condenser, engage phantom power after the mic is connected and the gain is down, then wait a moment before you bring the gain up. Dynamic mics do not need it, and leaving it on for a ribbon mic is how you destroy a ribbon mic.
Step six: pick your monitoring mode. Hardware or direct monitoring sends your input straight to the headphones with no trip through the computer, which means no perceptible delay. Software monitoring runs the signal through your DAW, which lets you hear plugins and effects while you track, but it adds latency. For tracking a part, use direct. For rehearsing a mix idea, use software.
Step seven: test the round trip. Record a click or a hand clap with the mic pointed at the source, then zoom in and look at the gap between the waveform and the grid. Aim for under 10 milliseconds. Under 5 is invisible. If it is worse than that, drop the buffer, close the browser tabs, and check whether the interface is on its own USB controller before you blame the converter.
Step eight: set up your mix minus and your levels, then do a test take. For a two person podcast, the guest needs to hear you but not themselves, which means routing everything except their own mic back out to them. Then record thirty seconds of silence and listen back at a loud volume. That is your noise floor. Fix the hum now, not after the interview.
Step nine: save the settings and label the tracks. Write down or screenshot the buffer, sample rate, and gain positions. Every time the interface resets, you will want them back, and you will never remember where the gain knob was sitting.
The competition and why it lost
There are interfaces I recommend all the time that are not in this guide, and it is worth saying why. The Focusrite Scarlett 2i2 is still the best first interface for a lot of people, mainly because its drivers are boring, which is the highest compliment I can pay a driver. The PreSonus AudioBox is the budget option that refuses to die; mine survived a decade of touring. The Audient iD14 has the best preamps under its price tier, and its instrument input is worth it for guitarists alone. The Universal Audio Volt is the pick for people who want to plug in and sound finished, and its vintage mode is a real trick rather than a gimmick. The Behringer U-Phoria line is a lot of interface for very little money, though the Windows drivers will test your patience.
None of those belong in a first setup guide, because they either sit a tier up in price or add features that get in the way before you have learned the basics. The same goes for anything whose headline feature is a bundled "pro" DAW. You are paying for the license, not the hardware, and the license is rarely the one you would have chosen.
What this costs in time and money
The hardware is the cheap part. The time is where the money is, and the good news is that the time is a one evening job.
Budget the first hour for the driver install, the device setup, and the first test recording. Budget a second hour for gain staging, because you should do it twice with two different sources so you learn where the sweet spot sits on your specific box. Then stop thinking about it and go record something.
The two interfaces in this guide sit at the bottom of the price range for a usable setup, and both will get you a clean 24 bit capture off a microphone. Check current Amazon price on either before you buy, because this class of gear moves around, and neither one needs a companion purchase besides a microphone, an XLR cable, and a pair of closed back headphones you probably already own.
Here is the honest math. The interface is the least interesting purchase in your signal chain and the one that decides whether the rest of it works. Buy the boring one, set it up in the right order, stage the gain properly, and spend your energy on the room and the performance. That is where the ten percent stops being ten percent.