A USB audio interface setup goes wrong in the same three places every time. The driver gets installed after the box is already plugged in. The gain gets set by eye instead of by meter. The buffer stays wherever the installer left it, so the person recording spends the whole session fighting a slapback delay in their headphones. I have watched all three happen in one afternoon in my own room, with a singer waiting six feet away and a client checking the clock.
Here is the good news. None of those problems are about the hardware. The interface is maybe 10 percent of how your recording sounds, and I will say that in every article I write because it is true. The other 90 percent is the room, the mic, the performance, and whether you set your levels like someone who intends to edit the take later.
So this is not a buying guide wearing a tutorial costume. It is the order of operations I run on every new interface that comes through my studio, plus the two boxes in the current crop that make that order easy to follow. One is built for a solo session. One is built for the moment a second person pulls up a chair.
Why you should trust me
I am Jules. I have been a recording engineer for 10 years, and I run a small home studio in Nashville that has tracked everything from two-person podcast interviews to full bands. I started on a $99 interface, and since then I have owned or borrowed nearly every model under $500. My current project is working through 2026 USB-C interfaces under $300 with a ribbon mic, a dynamic mic, and a lot of real session time on each one.
What that means for you is that I care about four things, in this order. Do the preamps stay clean when you push the gain? Is the round-trip latency low enough that you stop noticing it? Does the headphone amp drive a pair of 250-ohm cans without folding up? And would I hand this box to a paying client without apologizing for it? Everything below is filtered through those four questions.
How I chose these two
The gear here is not about which interface has the longest spec sheet. It is about which interface survives the setup process I am about to walk you through, on a mid-range laptop, with real microphones attached.
Both of the boxes below were judged on the same criteria: preamp behavior at high gain, driver stability across reboots, round-trip latency with plugins loaded, headphone output into a hard load, and whether the routing is simple enough that a beginner can figure it out without a manual. I do not publish a latency claim without measuring the round trip, and I do not call anything studio quality, because almost nothing under $300 is, and the ones that are do not advertise it.
One caveat up front. Neither of these is a magic wand. If your room has a hard floor and bare walls, a better interface will faithfully capture the bounce off your ceiling. Treat the setup steps as the priority and the box as the tool.
The interfaces that make this workflow easy
You can run the steps below on almost anything with a real preamp and a stable driver. These two just make the process shorter, and each one fits a different session.
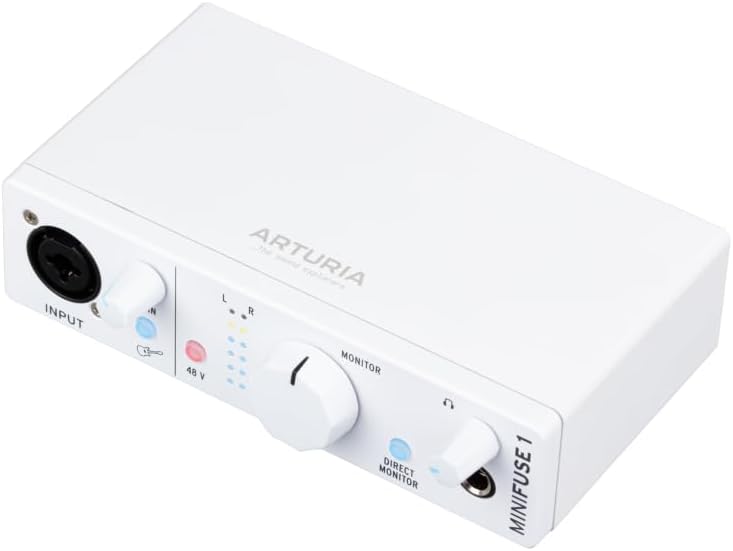
Best for a one-person setup: Arturia MiniFuse USB Audio & MIDI Interface, MiniFuse 1
 Visit on Amazon →
The MiniFuse 1 is the box I point at people who record alone: one voice, one guitar, one desk, one laptop. Check current Amazon price.
The reason it earns the solo slot is the MIDI interface built into the same chassis. If you write with a controller keyboard, you get note data and audio through one USB connection instead of two, and that is one less driver to argue with at 11 p.m. For a songwriter tracking a scratch vocal and a soft synth part in the same session, that matters more than an extra input you will never plug into.
The caveat is the obvious one. This is a one-input-at-a-time workflow. If your plan involves two people talking into two microphones in the same room, you are going to run out of inputs, and no amount of clever routing fixes that. Buy it for the solo session and keep the two-person work on the other box.
Anyone recording alone, writing with MIDI, and working on a laptop should start here.
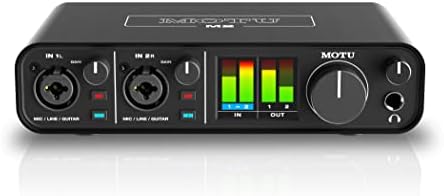
Best for two mics at once: PreSonus Studio 24c 2x2, 192 kHz, USB Audio Interface with Studio One DAW Recording Software
 Visit on Amazon →
The Studio 24c is a 2x2 interface, which is the spec that actually matters here: two inputs in, two outputs out, so two microphones can live on two separate tracks at the same time. Check current Amazon price.
That is the whole argument for it. A two-person interview or a guitar-and-vocal session recorded live needs two preamps, and it needs them on separate channels so you can fix a level problem in the mix instead of re-recording the whole thing. The 192 kHz rating in the name is not why I would buy it. Almost nobody needs to track at 192 kHz, and the file sizes will make you regret it. It is simply the ceiling the box offers, and you will live at 48 kHz like the rest of us.
The bundled Studio One software is worth mentioning honestly, because I am on record as a person who distrusts interfaces that lead with a DAW license. In this case the license is a bonus, not the headline. If you already record in another program, nothing about this interface forces you to switch. The two inputs and the driver behavior are the reasons it is here.
One caveat. Two inputs is the ceiling, not a starting point. If you are planning to track a drum kit, this is the wrong purchase and no setup trick will save you.
Anyone recording two people in one room, or one person with two microphones, should look here first.
The actual setup workflow
Now the part you came for. This order works on either box above, and it works on the interface you already own. Do it in this sequence and you will not spend the session troubleshooting.
Step one: install the driver before you plug anything in. This is the single most common mistake, and it is the reason people conclude their interface is broken. Download the current driver for your operating system from the manufacturer, run the installer, and only then connect the USB cable. Windows especially will grab the box with a generic driver if you give it the chance, and a generic driver is where latency problems are born.
Step two: set your sample rate and buffer size. Set the sample rate to 48 kHz unless you have a specific reason to go higher. Then set the buffer. Start at 128 samples. If you hear clicks, pops, or dropouts, raise it to 256. If everything is stable and you want the lowest possible delay, drop it to 64 and test again. The buffer is the dial that trades latency for stability, and there is no universal right answer because it depends on your computer, not your interface.
Step three: set gain staging by meter, not by ear. Set the gain so the meter kisses yellow. Then listen. That order matters, because your ears adapt to whatever level they hear first. If the meter is slamming into red on the loudest word, back it off. If it is barely moving, you will raise the noise floor when you normalize later. Aim for peaks that sit comfortably high without ever touching the clip indicator. This is 80 percent of a good recording, and it is free.
Step four: pick one monitoring path and stick to it. Most interfaces give you a direct monitoring option, either a knob or a software mixer. Use it. If you monitor through your DAW with a large buffer, you will hear your own voice arrive late, and it will make you sing worse. If you monitor through the hardware, you hear yourself immediately. Choose one, and turn the other off so you are not hearing a doubled, phasey version of yourself.
Step five: check the headphone amp with your real headphones. Plug in the cans you actually use, not the earbuds in your bag. Turn the volume up to a comfortable tracking level and listen for crackle at the low end of the travel. A headphone jack that crackles quietly is the most ignored failure in this price range, and it is the reason a session ends early.
Step six: run a round-trip test with a plugin loaded. This is the step everyone skips. Open a session, put an amp sim or a channel strip on the track, and play or sing while monitoring through the software. If the delay is under 10 ms it is fine, and under 5 ms it is invisible. If it feels like a slapback echo, your buffer is too high or your driver is doing something ugly. Fix it now, not during a take.
Step seven: build your mix-minus if other people are involved. The routing that lets a guest hear the host and the music but not themselves is the difference between a usable podcast and an unusable one. On a two-input interface, you send everything except that guest's own channel back to them. If you are recording alone, skip this step entirely and save yourself the headache.
Step eight: save the whole thing as a template. Levels, buffer, routing, track names, monitoring setup. Save it once and every future session starts already calibrated. This is the step that turns a 40-minute setup into a two-minute one.
The competition and why it lost
A few categories of gear did not make this article, and it is worth saying why so you do not buy the wrong thing on your way out.
Eight-input interfaces lose here for a simple reason. You do not need eight inputs to record a podcast or a song idea. You need two good ones and routing that works. Buying the bigger box means paying for preamps you will not use and spending your first session learning a mixer you do not need.
Interfaces that lead with a bundled professional DAW as the headline feature lose for a related reason. You are paying for a license, not hardware, and the license is rarely the one you wanted. A bundled DAW is a nice extra when the inputs and the drivers are already right, which is exactly how I treat the Studio One license above.
Single-input boxes with no MIDI lose if you write with a keyboard, because you end up buying a second adapter and managing a second driver. That is the specific gap the MiniFuse 1 closes.
And anything that needs a separate power supply just to deliver phantom power loses for a laptop-based setup, because the entire point of a laptop setup is that it fits in one bag.
What this actually costs
I am not going to quote you a number that will be wrong next week. Check current Amazon price on each box and compare them side by side, because both sit in the same budget tier and the difference is smaller than the difference in what they let you do.
Here is the honest math instead. The setup above costs you one afternoon, once. The template you save at the end of it costs nothing and saves you 30 minutes on every session after that. The mistake you avoid by installing the driver first costs you a support ticket and a wasted evening.
The box is the cheap part. The order of operations is the part that determines whether your recordings sound like you, only cleaner, or like a room with a laptop in it.
Do the steps in order, save the template, and never rebuild your session from scratch again. That is the whole job, and your interface was built to do it.
Check current Amazon price on the Arturia MiniFuse 1 and the PreSonus Studio 24c before you decide which side of the solo-versus-two-mic question you are on.