Setting up a USB audio interface should take twenty minutes. Most people turn it into a weekend. I have watched guitarists, podcasters, and voiceover folks stall on the same four things: drivers, input gain, direct monitoring, and buffer size. Get those four right and your USB audio interface setup stops being a mystery, and you can get back to actually recording.
I have been a recording engineer in Nashville for ten years, and I run a small home studio that has tracked everything from two-person podcast interviews to full bands. My first interface cost $99. Since then I have owned or borrowed nearly every model under $500. The order of operations below is the one I use on every new box that comes through the door, whether it is a $60 starter unit or a $300 desktop interface.
Why you should trust me
I test interfaces the way sessions demand, not the way a spec sheet demands. That means 40 or more hours of real recording per unit, preamp gain staging against a real ribbon mic, latency checks on a 2019 laptop that is not a gaming machine, and a round-trip test with actual plugins loaded. I keep a drawer of failed interfaces with fried headphone jacks, and I add to it more often than I would like. When I say a driver is stable, it survived a week of sessions without resetting my settings on reboot. When I say a headphone amp is weak, it clipped on 250-ohm cans before the meter showed a problem.
I am not going to tell you an interface makes you sound like a studio. The interface is maybe 10% of what ends up in the file. The room, the mic, the performance, and the gain staging are the rest. What a good interface does is get out of the way, and that is a much lower bar than most marketing departments want you to believe.
What you need before you start
You do not need much, but you do need all of it before you start troubleshooting:
- An interface with at least one combo input. If you plan to use a condenser mic, it needs 48V phantom power on that input.
- A microphone and an XLR cable. A dynamic mic like an SM7 or an SM58 is the easiest place to start because it needs no phantom power.
- Closed-back headphones. Open-back cans bleed into the mic and you will hear it on the take.
- A USB port on the machine itself. Not a hub, not a monitor's built-in hub, not a docking station. At least for the first setup session.
- Your DAW installed and updated. Reaper, Logic, Ableton, GarageBand, Audacity, whatever you already have. Do not buy a new DAW for this.
- The manufacturer's driver downloaded from their site. Ignore the disc in the box. It is always older than what is online.
One more thing worth saying up front: a bundled "pro" DAW license is not a feature. If the box leads with a software bundle, you are partly paying for a license you may never open. Buy the hardware for the hardware.
The two interfaces I point beginners at
I am not going to hand you a list of fifteen boxes. Two is enough, because the honest answer is that almost everyone reading this needs two inputs and one good headphone output, not eight preamps. Here is the cheap one and the safe one.
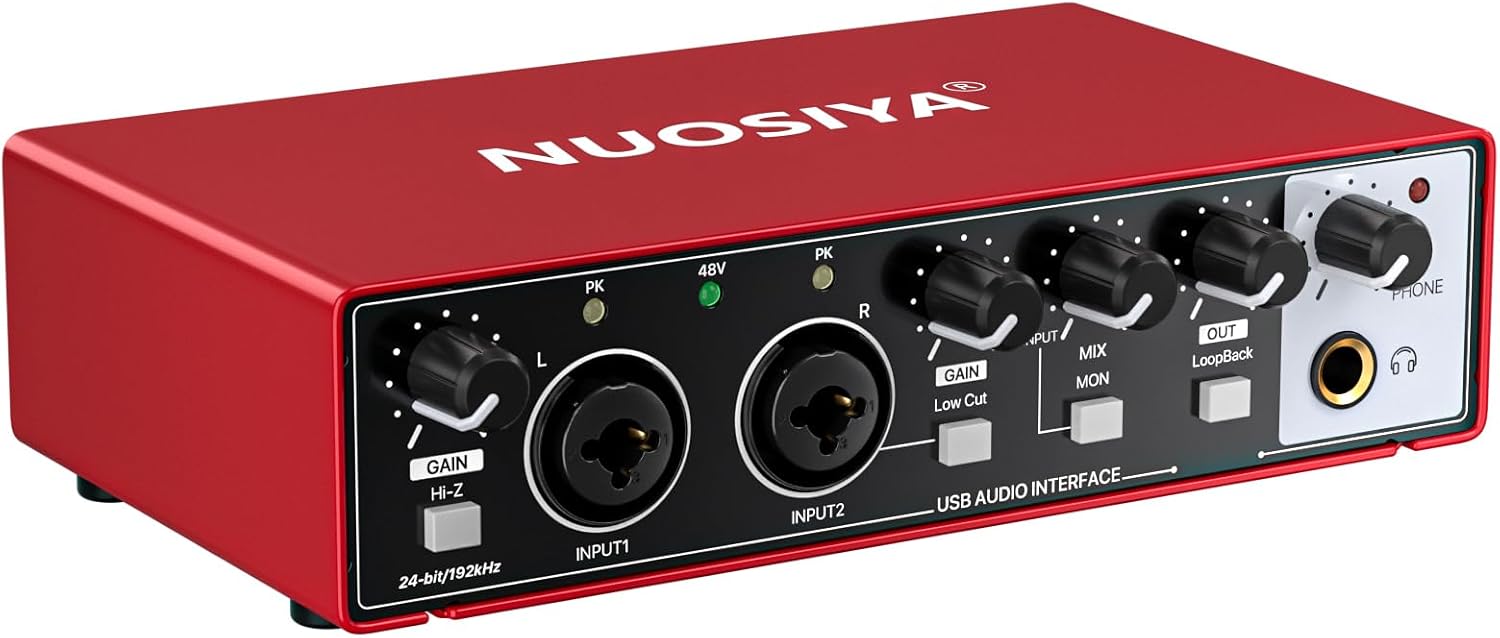
Budget pick: USB Audio Interface for PC Computer Recording Music, Red Guitar Audio Interface for Mac 24Bit/192kHz Podcasting Streaming for Vocalist Producer with 48V Phantom Power
 Visit on Amazon →
This is the one I point at when someone wants to find out whether home recording is for them without spending real money. The listing carries 24-bit/192kHz conversion and 48V phantom power, which between them cover the two things that actually matter at this price: a condenser mic that needs phantom power, and a clean enough converter that you are not fighting the box in the mix.
The name says guitar interface, and that is the right way to read it. If your plan is to plug a guitar into one input, a mic into the other, and record both at once, this covers that job. It is also the correct pick for a podcaster who needs one mic and one guest mic and does not want to learn a routing matrix to get there.
Flaws but not dealbreakers: At this price the driver and the headphone output are the two things I would verify first. Install the driver from the manufacturer's site, not from a third-party driver pack, and test the headphone jack with your own cans before the return window closes. Cheap headphone amps crackle at low volume when the pot is dirty, and that is a returned unit, not a fixable annoyance.
Anyone recording a single vocal, a single guitar, or a two-person podcast on a laptop should start here and upgrade later with actual information about what they need.
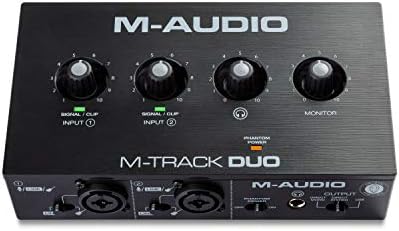
Our pick: M-AUDIO M-Track Duo USB Audio Interface
 Visit on Amazon →
This is the safe pick. M-Audio is one of the names that shows up in every beginner thread for a reason, and the M-Track Duo is the model I suggest when someone wants a known quantity, published drivers, and a support page that exists in three years when they need it. The Duo name tells you it is a two-channel box, which is exactly the input count a solo artist or a two-person show needs.
If you are choosing between this and the budget unit above, the question is not which one sounds better, because at this tier the differences are smaller than the internet wants you to believe. The question is which one you can get running on your operating system in an afternoon and forget about. That is worth the extra money to most people.
Flaws but not dealbreakers: Two inputs is a ceiling, not a floor. If you already know you need to track a drum kit, buy once and buy more inputs, because you will outgrow this the first time a friend shows up with a snare drum.
Anyone who wants one box that works with a condenser mic, a guitar, and a pair of headphones without a driver adventure should start here.
The setup workflow, step by step
Step one: install the driver before you plug anything in. On Windows this is not optional. Plug the interface in first and the OS grabs it with a generic driver, then you spend an hour wondering why your buffer settings will not save. On macOS most interfaces are class compliant and need no driver at all, which is a feature, not laziness. Check the manufacturer's page either way.
Step two: set the interface as both input and output. This is the mistake I see most often. People set it as the input, leave the output on the laptop speakers, and then wonder why they cannot hear themselves. Set the interface as the input device and the output device in your OS sound settings, and again inside your DAW's audio preferences. Then turn off any system sounds, notifications, and email chimes. Nothing ruins a take like a calendar alert.
Step three: connect the mic and set phantom power correctly. Phantom power is 48V and only condenser mics need it. Turn it on after the mic is connected, not before. Never send phantom power to a ribbon mic unless the manufacturer explicitly says the mic is safe with it. Dynamic mics do not care either way, but there is no reason to leave 48V running when it is not needed.
Step four: set your gain at performance level. Do not whisper into the mic and set the level, then belt the chorus. Perform the loudest part of the song or the loudest sentence of the script, and raise the input gain until the meter peaks around -12 dBFS, with occasional peaks kissing -6. If the meter is hitting 0, you are clipping, and clipping is not something you fix in the mix.
Step five: choose your monitoring path. Most interfaces have a direct monitor switch or a mix knob that blends the live input with the computer playback. Hardware direct monitoring has no latency at all, which is what you want while tracking. Software monitoring through your DAW is more flexible because you can add a little reverb, but it costs you latency. For a first session, use direct monitoring and keep it simple.
Step six: set the buffer size. Start at 128 samples. If you hear crackling, pops, or dropouts, raise it to 256. If you need tighter timing for tracking a fast part, drop to 64 and see if your machine holds it. When you move to mixing, raise it to 512 or 1024 and let the CPU breathe. Buffer size is a trade, not a setting you get right once forever.
Step seven: check the headphone output with your own headphones. Turn the headphone knob all the way down and then up slowly. Listen for crackle at low volume and for distortion at the top of the range. If it crackles, the unit goes back. This is the most commonly ignored spec on the box and the one you will live with every single session.
Step eight: record a two-minute test take and listen back. Say something, play something, sing something. Then listen on the headphones and on a second set of speakers if you have them. You are listening for hum, for clipping, and for whether the room is louder in the recording than you thought.
Gain staging, the step everyone skips
Set the gain so the meter kisses yellow, then stop. That single sentence is 80% of a good recording.
The reason beginners get thin, noisy tracks is almost never the preamp. It is that they set the gain too low, then crank the fader in the DAW, which lifts the noise floor along with the signal. Record at a healthy level and you never have to fight for it later. Aim for peaks around -12 dBFS, not -3, and definitely not 0.
If your interface has a pad switch, that is for loud sources, like a snare drum or a screaming guitar amp. If you need a pad on a vocal mic, something else is wrong.
Latency is a driver problem, not a chip problem
Under 10ms of round-trip latency is fine. Under 5ms is invisible, and you stop noticing it entirely. Above 15ms, timing falls apart, especially on drums and percussion.
Here is the part people miss: latency is mostly about the driver, not the converter chip. A great chip with a sloppy driver is a paperweight. On Windows, use the manufacturer's ASIO driver, not ASIO4ALL and not the generic WASAPI path, unless the interface genuinely has no ASIO driver. On macOS, Core Audio handles it, which is why Mac users complain about latency less often.
Two more things. Do not monitor through the laptop's built-in headphone jack, because you will hear the computer's output and the interface's input at slightly different times and it will feel wrong. And do not set your buffer to 32 samples because someone on a forum said so. Find the lowest setting your machine holds for a full take without a dropout, and use that.
When it does not work, check these five things
No signal at all. Check the input selection, the cable, the phantom power, and whether the channel is muted in your DAW. In that order. It is the cable more often than anyone wants to admit.
Hum or buzz. Usually a ground loop or a laptop charger. Try running the laptop on battery for a test. If the hum disappears, it is the power supply, and a ground loop isolator or a different outlet will fix it.
Crackling and dropouts. Almost always the buffer size or a USB hub. Go straight to the machine's own port, raise the buffer, and check that your OS power plan is not throttling the CPU.
Settings reset on every reboot. That is a driver problem, and it is the single most annoying failure mode in this category. Reinstall the current driver from the manufacturer's site and remove any older driver first.
Headphone crackle at low volume. Dirty pot or a weak amp. If it is new, return it.
What this all costs
The two interfaces here are both in the entry tier, so check current Amazon price on each and compare against your actual budget. Neither one is a mistake at its price.
Run the math over two years instead of over the weekend. A $60 interface used three hours a week for two years costs about 20 cents per hour of recording. That is less than the strings, the cables, and the coffee. The expensive mistake is buying an eight-input box for a two-input job and then not using it, which is a mistake I have made and quietly corrected.
The 20 minutes you spend doing the steps in order, driver first, gain second, buffer last, is the difference between an interface that sits in a drawer and one that records every week. Do it once, save the settings as a preset in your DAW, and never rebuild the session from scratch again.
That is the job. Your interface was built to do this. Let it.