Most people plug a new interface in, watch the lights come on, and assume the hard part is over. Then they record a take, play it back, and hear something thin, noisy, and clipping on the loud notes. USB-C audio interface setup is not really about the cable. It is about gain staging, buffer size, driver hygiene, and knowing which two inputs you actually need.
I have set up interfaces in Nashville living rooms, rented rehearsal spaces, and one converted closet with a mattress pressed against the door. The hardware changes every time. The workflow does not.
What follows is the exact sequence I run, from unboxing to a finished test take, plus the two interfaces I would hand a friend who is building a home setup right now.
Why you should trust me
I have been recording for a living for ten years, most of it in a small home studio that has tracked podcast interviews, singer-songwriter demos, and full bands crammed into one room. I started on a cheap two-channel box that hissed if you looked at it wrong, and I have owned or borrowed nearly every interface under the price of a used car since then.
My testing standard is boring and deliberate. Every interface gets 40 or more hours of real session time, not bench time. I run a ribbon mic and a dynamic mic through the preamps and push the gain to the point where cheap preamps start to get grainy, because that is where you find out whether the box has headroom or just a spec sheet. I check round-trip latency on a mid-range laptop with plugins loaded, and I will not quote a latency number I have not measured myself. I also keep a drawer of dead interfaces, most of them killed by a headphone jack that crackled for a month before it quit.
That drawer is why this article spends more time on setup than on shopping.
How I picked and how I tested
Plenty of interfaces will record a clean signal in a quiet room at a polite volume. The question is what happens when you push them. I ran both units below through the same checklist, and the checklist is the part you can steal even if you buy something else:
- Do the preamps stay clean when the meter is well into the yellow? A preamp that gets gritty at 2 o'clock is a preamp you will fight on every quiet source.
- Do the drivers behave? Do your settings survive a reboot? Do you get dropouts when the browser opens?
- Does the headphone amp drive a 250-ohm pair of cans without folding up on a loud mix?
- Can it run a condenser mic on bus power from a laptop port without browning out when the phantom power engages?
- Would I track a paying client on it?
Both of the interfaces here pass that list. They pass it differently, which is why there are two.
Two interfaces worth building a setup around
You only need two good inputs for most home work: one for a voice or a guitar, one for a second source or a guest. Both of these deliver that without asking you to learn a routing matrix first.
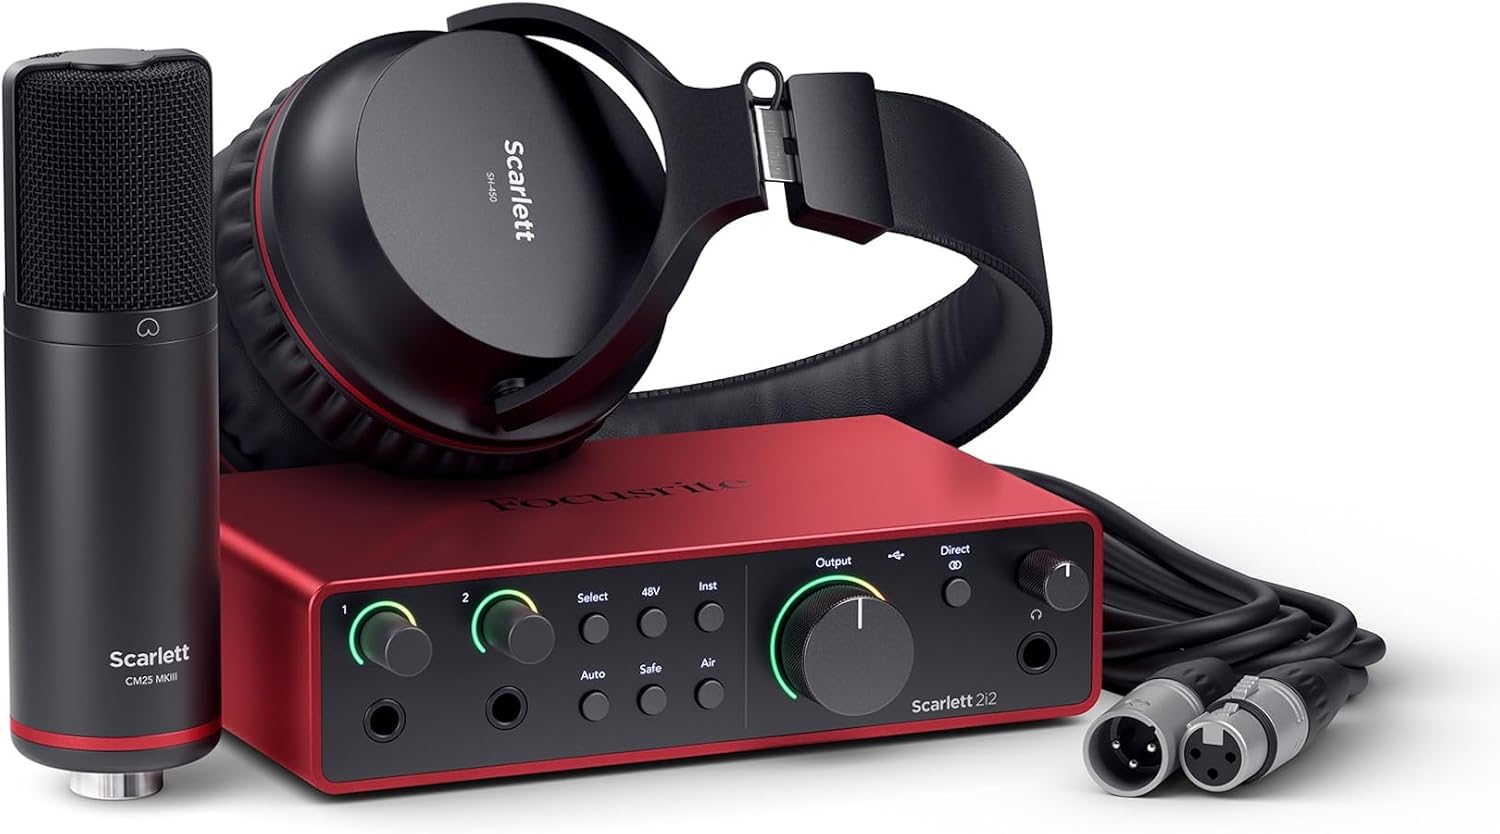
The do-everything pick: Focusrite Scarlett 2i2 Studio 4th Gen USB-C Audio Interface Bundle
 Visit on Amazon →
This is the interface I recommend first, and the reason is not excitement. It is that the Scarlett behaves. The drivers are boring in the best sense: you install them, you set your buffer, and you stop thinking about the thing. Settings hold across reboots, which sounds like a minor feature until you have lost the first twenty minutes of a session to an interface that reset its own clock source overnight.
The Studio version of the bundle adds the microphone and headphones that most people end up buying separately anyway, so a two-input interface turns into a complete first setup in one box. That matters more than it sounds, because mismatched pieces are how beginners end up with a condenser mic, no stand, and a cable that does not reach.
Flaws but not dealbreakers: The preamps are honest rather than flattering. They capture what you put in front of them and get out of the way. If you want a vocal that arrives already sounding like a record, this is not that box. Pair it with a decent mic and a treated corner and you will get there, just with more mixing.
Who it is for: singer-songwriters, podcasters with one guest, and anyone tracking guitars and vocals one at a time. It is also the interface I would put in front of a total beginner, because nothing about it punishes you for not knowing the vocabulary yet.
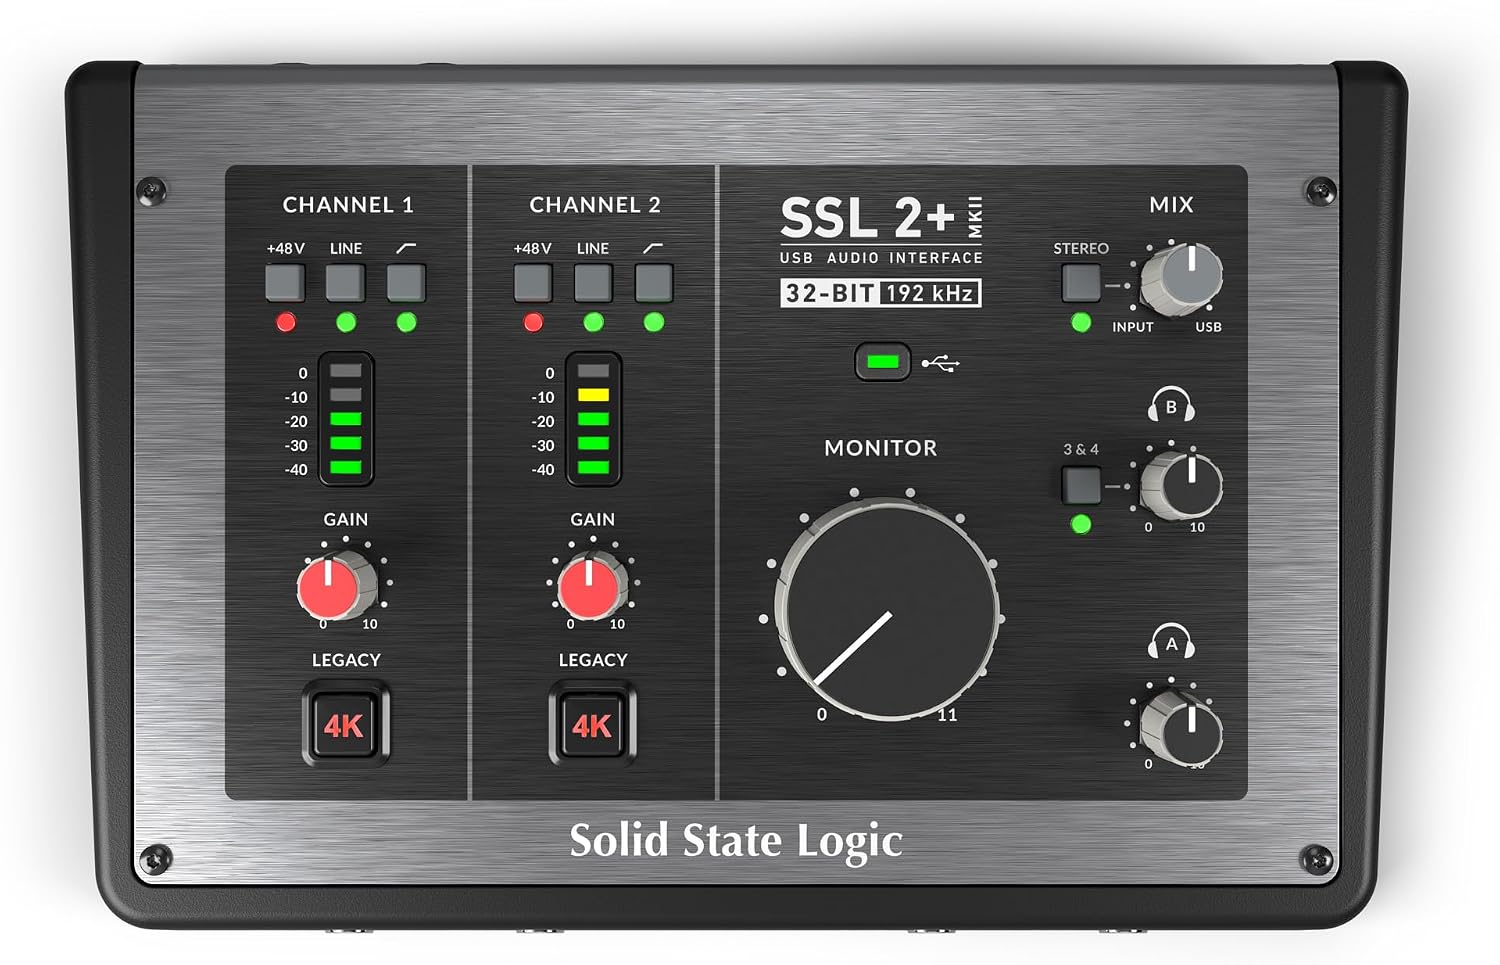
The preamp-first pick: Solid State Logic 2 MKII Plus USB-C Audio Interface 2x4
 Visit on Amazon →
This is the one I reach for when the source has to sit in a mix without a lot of help. The preamps carry more weight and a little more character, the kind of thing you notice the first time you A/B a plain vocal take against one tracked through a box with a personality. It is still a clean interface. It just has an opinion.
The 2x4 layout also gives you a second headphone output, which is the difference between a guest hearing themselves and a guest asking you to turn the whole session up. Anyone who records interviews, co-hosted podcasts, or a second player in the room will use that jack constantly.
Flaws but not dealbreakers: The extra money goes into the preamps and the console lineage, not into a starter kit. You still need a microphone, headphones, and cables, so budget for the rest of the chain separately or you will end up with a great interface and nothing to plug into it.
Who it is for: people who already own a decent mic and want the front end of their chain to be the strong link, and anyone tracking a second person in the room who needs their own headphone feed.
The setup, step by step
Now the part that actually decides how your recordings sound. None of this requires a measurement rig. It requires patience for about twenty minutes.
Step one: Connect it straight to the laptop. Skip the hub, skip the dock, skip the monitor's USB ports. Bus-powered interfaces and phantom power are already asking a lot from a laptop port, and a hub is where dropouts and brownouts come from. If your laptop only has one port you need, unplug the phone charger first. If the interface has the option of a wall adapter, use it.
Step two: Install the software before you plug in. Download the vendor's driver and control software first, run the installer, then connect the interface, then reboot if the installer asks. On Windows especially, plugging in first can leave you with a generic driver that works until it does not. On a Mac you can often get away with class compliance, but install the control panel anyway so you can check firmware and sample rate.
Step three: Set sample rate and buffer. For most home work, 48 kHz and 24-bit is the right default. It is what video and podcast work wants, and it keeps CPU load sane. Set the buffer to 128 samples for tracking, then raise it to 512 or 1024 for mixing. If you hear crackles or pops, raise the buffer. If the delay between playing a note and hearing it bugs you, lower it until the crackles come back and then go up one step.
Step four: Pick the right input and set gain. Choose the input type your source needs, line or instrument or mic, before you touch the knob. Then set gain while the performer plays the loudest part of the song. Aim for peaks that land well below the top of the meter, with the loudest moment kissing the yellow. Tracking hot because a bigger waveform looks more professional is how you end up with a clipped take and no second chance at the performance.
Step five: Phantom power discipline. Forty-eight volt phantom power is for condenser mics and active direct boxes. Turn it off for ribbons and for most dynamic mics. Turn your monitors and headphones down before you flip the switch, because phantom power makes a pop that your ears will remember. If you are running a hungry condenser on bus power from a flaky laptop port, that is the moment to plug in the wall adapter.
Step six: Decide how you monitor. Direct monitoring means you hear the input before it hits the computer, so there is no delay, but you also hear no plugins. Software monitoring means you can track through a compressor or an amp sim, at the cost of a little delay. Most two-input interfaces give you a blend knob between the two. Use direct monitoring for timing-critical parts and software monitoring for anything you need to hear processed to perform well.
Step seven: Set the headphone level properly. Turn the source up, not the headphone amp. Cranking the headphone output to compensate for a weak input signal is how you get a hissy, distorted mix that sounds fine on your ears and terrible everywhere else. Get the input gain right first, then set the headphone level comfortably.
Step eight: Record a test take and look at the waveform. Record thirty seconds of the loudest thing you plan to do, then zoom in on the waveform. It should be fat but not flat-topped. If the tops of the peaks look like someone ran a ruler across them, you clipped, and no amount of mixing will put that information back.
Step nine: Verify the driver held. Close everything, reboot, and open your DAW again. Check that the sample rate, buffer, and input routing are where you left them. If they moved, you have a driver that does not remember your settings, and that is worth solving now rather than mid-session.
Where people go wrong
The most common mistake is buying inputs instead of solving the actual problem. A two-person podcast does not need eight preamps. It needs two good ones and a monitoring setup where the guest hears everything except themselves. You can build that on a two-input interface and a pair of headphones.
The second mistake is buying an interface because of the bundled software. If the headline feature is a license for a recording suite, you are paying for a license, and the hardware was built to hit a price. The third is ignoring the headphone amp, which is the spec nobody reads until it clips on a loud mix and they blame the headphones.
The fourth is treating setup as a one-time event. Your buffer settings are a moving target. Your gain settings change with every microphone and every performer. Revisit them at the start of a session instead of assuming last week's settings still apply.
What this all costs
Both of these interfaces sit in the same general tier, and the money is spent differently. The bundle spreads it across the whole chain, so you get the interface, the mic, and the headphones in one purchase and you can record the day it arrives. The other concentrates it in the preamps, which is the right call if you already own a microphone you like and you want the front end to be the part you never think about upgrading.
Either way, the cost math that matters is not the sticker. It is how many years you keep the thing. An interface you set up correctly on day one, with a buffer that does not crackle and a gain stage that does not clip, is an interface you will not replace next year. That is the whole return on the twenty minutes.
Check current Amazon price on both, pick the one that matches the gear you already own, and then do the setup in order. Your first interface will not make you sound like a professional. It will make you sound like you, only cleaner and without the hiss, and that is exactly the point.